Sorry, I've been looking for an excuse to use that title, and I just can't find the right post.
Anyhoo - I've got a favor to ask y'all. A good friend of mine from just got canned. Well, let me just say that he has extensive civil software and survey knowlege but not in Civil 3D. He has his RLS and is a fantastic pre-sales kinda guy. Sharp, personable, he used to be my go-to guy for all things Navcom/GPS related. He is currently located in Rochester, NY but is willing to relocate. Help me help a homie out. Email me at hollandlouisa@hotmail.com and I'd be happy to throw you his resume.
Thursday, May 31, 2007
Datum? I hardly Even Know 'um!
Posted by
Louisa Holland
at
Thursday, May 31, 2007
0
comments
![]()
Wednesday, May 30, 2007
Lost and Found

Posted by
Louisa Holland
at
Wednesday, May 30, 2007
0
comments
![]()
Wednesday, May 23, 2007
SQOTD: Civil 3D for Beginners - For Real
My name is Ricardo*, and I came across your blog by doing a search on the internet for civil 3d help for beginners….My firm has been using LDT 2004 and now we just received civil 3d 2008 and they want me to figure it out….and I really don’t know where to begin….was wondering if you had any suggestions or new of any website that would provide me with a little help. Thanks for any help you may give me and for taking the time to read this.
Hi Ricardo -
Thanks for writing me. It's nice to know that people are actually reading my material.
So you are looking for some guidance as far as getting started from scratch in Civil 3D, eh? Well, your best bet is to take the standard three-day introductory course from your local reseller. If they don't offer it or the class is not in your budget, there are still resources out there for you. The tutorial can be accessed from the Help menu, or it can be found at C:\Program Files\AutoCAD Civil 3D 2008\Help\Civil_tut.pdf. I also like the Getting Started Guide located in C:\Program Files\AutoCAD Civil 3D 2008\Getting Started Guide\Civil_3D_GSG.pdf. (If you can't find these items, modify the install and make sure they are selected.)
A few things to keep in mind when you are getting going:
- Civil 3D is a totally different program from your current LDT 2004. If your reseller even suggested that to know one was to know the other, they were misleading you.
- The #1 hardest thing about learning Civil 3D is getting things to look the way you want. Understand the concept of Styles and what can be changed in the Settings area, and you understand Civil 3D.
- Templates (DWT's) are king. Units, default stuff and styles should all be part of your template. These replace the concept of the project Prototype in LDT.
- Try to quit "cold-turkey" on the LDT. Once you have converted a project from LDT to Civil 3D keep it in Civil 3D. It is very cumbersome to mix the data back and forth. You do have the Land Desktop Companion DVD - you may decide to use that until your current projects are put to bed.
I hope this information helps!
Good luck and Happy Learning!!
Lou
P.S. Here are some good websites to check out:
http://civilcommunity.autodesk.com/ check out the free webcasts and discussion forums out there.
http://civil3drocks.blogspot.com/2006/06/lone-wolfs-guide-to-learning-or-trying.html This is very helpful - she gives things to look out for in more depth than I've done here.
www.civil3D.com Information here runs the gammut from basic how-to's to intense work-arounds.
and then as soon as it is available get this book:
Posted by
Louisa Holland
at
Wednesday, May 23, 2007
1 comments
![]()
Monday, May 21, 2007
Vault
Ok, I have to eat a little crow. Vault really isn't the incarnation of Satan on Earth...IF it is implemented properly. I just had a rough week fixing an upgrade gone bad. It was one of those deals where the client tried a few things before taking any advisement from us.
Things you MUST do to make your Vault implementation go smoothly:
- Get a dedicated server. It isn't going to do you much good to use Vault if your backup server, mail server, and file share go down and happen to be one in the same.
- Get I.T. involved. They are not just for fixing paper jams anymore.
- Work with your reseller! They have done this before. Trust them.
- Train your staff. Vault workflows are beautiful and elegant when everyone understands and uses the process.
- Understand and use ADMS. There are tools in there to compact and ensure the stability of your data. Don't fear the purge.
Ok, I promise no more throwing FUD.
Posted by
Louisa Holland
at
Monday, May 21, 2007
0
comments
![]()
Data Shortcuts in a Nutshell
![]() In my humble opinion, Data Shortcuts are a better alternative for smaller companies than Vault. Therefore, I'm creating this little "crash course" for Data Shortcuts.
In my humble opinion, Data Shortcuts are a better alternative for smaller companies than Vault. Therefore, I'm creating this little "crash course" for Data Shortcuts.
Working With Data Shortcuts in Civil 3D 2008
What are Data Shortcuts?
Data Shortcuts are external files which allow multiple users to access data from a Civil 3D project without needing to access the drawing file.
What are the advantages of using Data Shortcuts?
When using Data Shortcuts, a project can be split up into several drawing files that all reference the same data. Therefore, multiple users can collaborate on a Civil 3D project at the same time.
Having data shared through several drawings is advantageous because it cuts down on the file sizes of the DWGs.
What types of data can be shared using Data Shortcuts?
- Surfaces
- Alignments
- Pipes
- Profiles
- View Frames
How do I use Data Shortcuts?
Say you have a source drawing from which you’d like to share data. This “source drawing” contains an existing ground surface and a horizontal alignment.
In the source drawing:
1. Go to General > Data Shortcuts > Edit Data Shortcuts… 
Now you will see the window where Data Shortcuts are created.
2. Click the Create Data Shortcut by Selection button.
Select the entity (or entities) you’d like to add as a reference.
Click the Export Data Shortcuts to File button.
You will be prompted to save an XML file.
The source drawing as well as the XML file should be on a network location. The files do not need to be in the same directory, but they should be able to be “seen” by all users who will collaborate on the project.

Note: It is good practice to separate types of data in their own XML file, as shown at left.
There is no limit to the number of shortcuts you can make per drawing. For instance, if you’d like to have an XML file for each separate alignment, that’s good too!
Once the XML file is created, you no longer need the shortcuts listed in the Panorama view. You can control what items are listed in the Data Shortcut Window by deleting them using the Delete Shortcut button.
Now, let’s say that you would like to work with a surface in a new drawing. You don’t need to edit the surface, but you want to reference it when designing parcels, for instance.
In the second drawing:
1. Go to General > Data Shortcuts > Edit Data Shortcuts…
2. Click on the Import Data Shortcuts from File button.
3. Browse to the location of the recently created XML file. Select the file and click Open. You should now see a list of your shortcuts.
4. Right-click on the item you’d like to work with, and select Create Reference…

You will be prompted with a dialog box that allows you to change the name and style of the object if you wish.
From here on out you can see the information and work with it. (You are not able to edit the data.)
What Happens When Updates are Made to the Source Drawing?
As soon as the user working in the source file saves his or her changes, the underlying XML file is automatically updated. There is no need to re-create the XML shortcut.
The person who is using your Data Shortcut will need to synchronize the object. The user will see a symbol with an exclamation point indicating that the object is out of date with the XML file. Right-click on the object and select Synchronize.
Posted by
Louisa Holland
at
Monday, May 21, 2007
2
comments
![]()
Labels: Data Shortcuts
SQOTD: Raster Design Not Transforming My SID!!
Posted by
Louisa Holland
at
Monday, May 21, 2007
0
comments
![]()
Friday, May 18, 2007
Experience the Possibilities
I'm planning on attending the Chicago Event.
See you there?
http://experience.autodesk.com/adsk/servlet/?i=1016
Posted by
Louisa Holland
at
Friday, May 18, 2007
0
comments
![]()
Tuesday, May 15, 2007
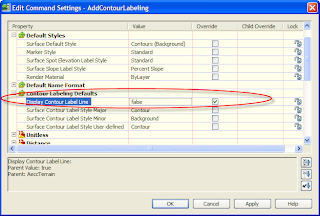
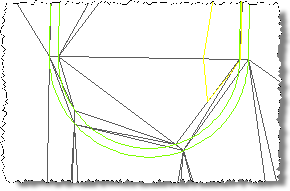
SQOTD: Surface from Breaklines Acting Weird

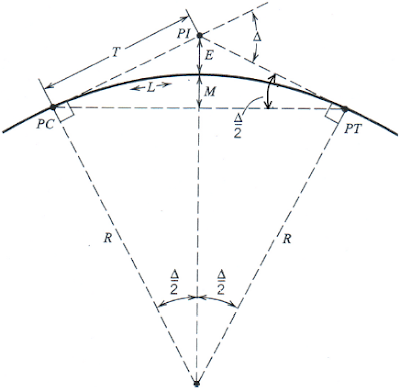
 Middle Ordinate Distance is the perpendicular distance between an arc and the midpoint of a chord. See the fun little picture to the left. M is mid-ordinate distance. M= R-R*cos (delta angle/2)
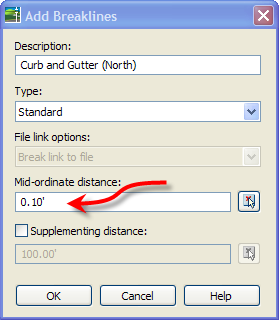
 A. As you add the breaklines, you get this dialog box. Give your breaklines a sensible name in case you need to modify them from prospector at a later date.
Posted by
Louisa Holland
at
Tuesday, May 15, 2007
1 comments
![]()
Friday, May 11, 2007
SQOTD: 32 vs 64 Bit?
From now on I'm going to title my Support Question Of The Day posts with the abbreviation SQOTD. Yes, I know its poor form to include the "of" and the "the" in the abbreviation, but I don't care. I need to pronounce this as "squatted."
Louisa,
Can you get back to me right away on this? Our client had asked if they can install Autocad 2008 on a 64-bit machine, and we responded stating it would be available in a 64 bit version. Do we need to let him know that Autocad Map 2008 is an exception to this, and not available in 64 bit?
Thanks!
Vicki
Hi Vicki -
Autodesk's 2008 suite of products are both Windows XP and Windows Vista compatible. However, Windows XP and Windows Vista come in both 32 and 62 bit versions. The version of Windows can be determined by viewing the properties of "My Computer". Since 64 bit technology is still new, it is most likely that users are running 32 bit.
I strongly recommend sticking with 32 bit versions of Windows for at least the next year.
Base Autocad does have both a 32 and 64 bit versions. When installing "vanilla" Autocad, the install program automatically determines your Windows type and installs the appropriate version. No user interaction is required.
Other versions of Autodesk software will only install on the 32 bit versions of Windows. Map 3D 2008, Civil 3D 2008, and Autocad Architecture 2008 will only work on 32 bit operating systems. The installation program will check what version of Windows is running. If 64 bit is found, the install program will abort.
Here is a great little chart to help you out:
http://www.cadforum.cz/cadforum_en/qaID.asp?tip=5536
~~~~~
Ok, as an addendum to this...
Yes, there are hacks to force products to install on 64 bit machines. They are bad, BAD, BAD, BAD! Take my advice, don't do it. Don't make me drive out in a diaper to slap you.
Posted by
Louisa Holland
at
Friday, May 11, 2007
0
comments
![]()
Wednesday, May 09, 2007
Happy Trimble News
Guess what's out?!
Trimblelink for 2008. Yay.
http://www.trimble.com/link_ts.asp?Nav=Collection-47487
Only question left is...does it work? Details to follow.
Posted by
Louisa Holland
at
Wednesday, May 09, 2007
0
comments
![]()
Monday, May 07, 2007
On Wisconsin!
Exciting news from the State of Wisconsin.
They are staying true to the state motto, Forward by looking at the future of their civil design software. For the last year or so the state has had a technical committee comprised of engineers, drafts-people and GIS gurus re-evaluating their software.
Last week at our Madison Civil 3D 2008 product launch, one of the committee members announced to us and the other clients present that the WISDOT Technology Committee had made the recommendation to move to Civil 3D!
Keep in mind this is by no means a done deal. What it does mean is that a non-biased committee worked very hard to find the right solution for their users, and when going head-to-head with In-roads, Civil 3D was found to be the most complete solution. (You should have seen the RFP man, whew!) Now we still wait and see what happens now that that the committee has made their recommendation.
This is a huge step for the State. They are facing a platform change from the Bentley products which in itself will cause some unhappy users. It could be years before people reach the level of proficiency they had with Microstation and Caice. Other states are waiting to see what is happening here in Wisconsin, so a smooth implementation is critical but without precedent.
With any luck, we are looking at the beginning of the end of the decades long disconnect between the software private industry prefers and the software the States have been stuck with.
Posted by
Louisa Holland
at
Monday, May 07, 2007
0
comments
![]()
Friday, May 04, 2007
Customizing Your User Interface: Part 1
 Congratulations! You just installed your new Civil 3D 2008 Software! What's that you say? You can't find all those neat little tool bars you were using in your old Land Desktop 2005? Never fear, I'm here to help.
 What's a workspace and why do I need one?
A workspace is your home. The place where you can hang your Thomas Kinkade prints and play all your favorite Donny Osmond records. This is where your toolbars and menus will show up. If your little sister comes in and messes up your menus, you can just re-select your workspace and everything will go back to where it belongs.
I strongly recommend starting your own workspace.
In your new workspace you can have all your Civil menus and toolbars and a few of your own if your wish.
To create a new Workspace, just click on the dropdown menu and choose Save Current As... It will prompt you for a name of your new work space. Then click Save.
Your new workspace is now current. It takes on all the properties of whatever workspace you were in when you went to Save Current As...
To allow for further modification click on Workspace Settings. 

While you are in the process of getting things to look the way you want, have Automatically Save Workspace Changes selected. Now you can re-arrange toolbars or add more from the ACAD group. The next time you fire up C3D, the menus and toolbars will remain in the location you put them.
Click OK and have fun redecorating your little workspace.
How do I make my very own toolbar in C3D from scratch?
Well, the nice people at Autodesk consolidated your menu files into one area. What used to be MNS and MNU files is now smooshed together in the CUI.
Select Customise from the Workspace dropdown and you will see the following screen:
To answer this question in a quick and dirty manner, I will guide your attention to areas I and III.
First, you will want to set a workspace current. Preferably the one you created with your name on it.
In area I, find the category called Toolbars.
Click the plus sign to expand the category. Right-click on Toolbars and select New Toolbar...
Give the toolbar a name.
Cool?
Find the tool you want to add in area III. Drag and drop it onto your new toolbar. When you see the little blue triangle, it's okay to let go.
Keep adding to your toolbar to your heart's delight! Click OK when you are done.
In my next installment, I'll show you how to add macros and flyouts to your toolbars. If I'm feeling generous, I'll talk about menus too.
Have a frigging awesome weekend!
Posted by
Louisa Holland
at
Friday, May 04, 2007
0
comments
![]()
Tuesday, May 01, 2007
C-ing Your U.I.
 Translation: Customizing your user interface.
I've had lotsa questions in the last few days trying to make Civil 3D look a certain way. First I'll answer a question e-mailed right to me:
I'm paraphrasing a lot: What can I get rid of to maximize my drawing area?
First, my favorite thing to get rid of are the scroll bars. With a wheeled mouse doing your panning and zooming, they are not needed. To get rid of them go to OPTIONS (type it in on the command line or right-click pretty much anywhere). Go to the Display tab and uncheck Display Scroll Bars in Drawing Window. 
As far as getting rid of things in your Status Bar area, it's possible - but you don't get any additional drawing space out of it. There isn't a way to make the gray bar thingy go completely away.
Another thing I would recommend is creating a tool bar with your favorite basic AutoCAD tools in it. That way you are not stuck with the entire Draw, Modify or Layer tool bar intruding on your space. I'll go into more detail about this in the near future - I promise.
Lastly, when working with the Tool Palettes, squish them up as much as your eyes can stand it. If you right-click on any tool palette, you can choose View Options.
(Come to think of it, you could also use Auto-Hide, but personally, I find Auto-Hide annoying)
In View Options, crank down the Image Size. Then you can make the palettes smaller.
Look how cute and petite they are now!
Posted by
Louisa Holland
at
Tuesday, May 01, 2007
0
comments
![]()
Insane Vault-ADMS Error Message - and How I Fixed It
ADMS = Autodesk Data Management System (not American Donkey and Mule Society, as previously thought.)
Holy Christ...check out this error message I got after a complete uninstall and reinstall of the Civil 3D 2008 product:
Some history: On my machine I have every CAD program known to mankind. I had beta 2 installed, then Beta 3. Before installing my spanking new, serialized and legit Civil 3D 2008, I uninstalled all mention of 2008 products. I nuked all the folders it left behind. Since there can only be one version of Vault on a machine at once, I removed Vault 5 from 2007.
After the lengthy reinstall, C3d worked. Vault installed but ADMS did not install. I received the absurd error we see here.
Turns out I needed to totally uninstall SQL too.
If you get this error - the text talks about SOAP and crazy stuff. Just ignore it and uninstall.
Posted by
Louisa Holland
at
Tuesday, May 01, 2007
0
comments
![]()


