Thursday, July 26, 2007

Civil 3D 2008 - Service Pack 1

http://usa.autodesk.com/adsk/servlet/ps/dl/item?siteID=123112&id=9909730&linkID=9240698
Note: You may need your Civil 3D install disks handy when loading this! (I did)

Some highlights of things it fixes (adapted from the read-me):

  • That crazy quirk where moving or placing an assembly on the tool palette causes the assembly to blow up has been fixed!
  • Grading should crash a little less.
  • Points are going to be easier to control - '08 liked to throw all your points on Layer 0 if they came in and matched a description key.
  • Looks like they've been keeping the survey programmers busy. Let's hope it stays that way.

Friday, July 13, 2007

AutoCAD Quiz


I teach a lot of base Autocad in addition to Civil 3D. The people who take AutoCAD classes tend to fall in 2 categories: 1) New, younger people getting training from an employer. 2)Older employees getting re-purposed.

The latter tend to be harder to teach/reach. The older folks (and they tend to be fellas) did not grow up with computers - which makes them gunshy. Generally, they don't like to click or explore or try something just for the heck of it. When one of these guys leaves my class confused and frustrated, I take it very personally. I feel that I have failed them.

In an effort to combat this issue, I have made a quiz based off of the Ascent (I fondly call it "ass-scent") materials that we use.


AutoCAD Self-Assessment – Day 1

Match the letter of the screen component with its correct name


A. Layer Control

B. Drawing area

C. Tool Palette

D. Modify Toolbar

E. Command line

F. Status Bar

G. Draw Toolbar

H. File Name

I. Workspaces Pull-down

J. Menus

K. UCS Icon

L. Cursor with Dynamic input

M. Layout Tabs

Most AutoCAD commands can be executed in the following ways, except:

  1. Key-in on command line
  2. Select the command from the pulldown menu.
  3. Yell the name of the command at the screen.
  4. Clicking the icon for the command from a toolbar.

When performing a Save-As command, what is the oldest AutoCAD DWG format you can choose?

  1. AutoCAD 2007
  2. AutoCAD 2004
  3. DWT
  4. AutoCAD 14

When Dynamic input is on, what keys will work to switch between input fields?

  1. Tab or Comma
  2. Esc or Spacebar
  3. Enter or Tab
  4. Esc or F3

How many different methods can you use to draw a circle in Autocad?

  1. 2
  2. 4
  3. 3
  4. 6


What is the correct term for the blue squares shown above?

  1. a Blue Squares
  2. b Grips
  3. c Grabbers
  4. d Selection indicators


In the screen capture above, when the user clicks a second corner of the selection window, which objects will become selected?

  1. The rectangle only.
  2. The rectangle and the line.
  3. The circle only.
  4. None of the above.


In the screen capture above, when the user clicks a second corner of the selection window, which objects will become selected?

  1. The rectangle only.
  2. The rectangle and the line.
  3. The circle only.
  4. None of the above.

Match the Object Snap Symbol to the name of the object snap:


    1. Quadrant
    2. Endpoint
    3. Intersection
    4. Tangent
    5. Center
    6. Midpoint

What graphic cue tells you that polar tracking is activated?

  1. A dotted line appears over the cursor.
  2. The screen blinks twice.
  3. A message appears in the command line.
  4. There are no graphic cues for Polar Tracking.

Which of the following is not a valid key-in at the Select Objects prompt?

  1. CP
  2. L
  3. A
  4. P
  5. F

In what situation will AutoCAD skip the Select Objects prompt?

  1. When using the Copy command.
  2. When an object or objects is already selected before the command is started.
  3. If there is more than one drawing open.
  4. If the shift key is held down at the time of starting the command.
  5. Never, AutoCAD will always prompt a user to Select Objects.

Which modify commands require you to specify a base point?

a. Move

b. Copy

c. Rotate

d. Scale

e. All of the above

True or False: You can Copy an object by holding down ctrl key while you select its grip.

True or False: Snap overrides can be accessed by pressing shift and right-click at the same time.

True or False: You must exit a command before using Snap overrides.

True or False: Polar tracking can only happen at 45ยบ angles.


Day 2 coming soon.


An AE, EIT with PMS

What is annoying me today? Here's a list:

1) People I've taught in class calling me directly, after I have specifically told them to seek help via the support line. I'm not trying to be a beeatch, but if I am not available, other operators are standing by. Last class I taught I didn't pass around business cards - but they called via front desk asking for me. Take the hint people!

2)Users who complain the help files or tutorials were not helpful. Seriously? I consider myself pretty dense and slightly ADD but I find the Autodesk help files pretty clear. You do need to learn to navigate them to find what you want - but they are NOT the help files of days of yore when you needed a phd in comp-sci to read them.

3)Sales people. The good ones leave, the bad ones won't shut up. What horrible thing happened in your childhood to make you want to be in sales?

4)New users saying, "It must be a bug." How do you know if its a bug if you don't even know what the software does?

5) The lack of chocolate at my desk! Appease me, dammit!

Friday, July 06, 2007

Come One Come All

Wisconsin Civil 3D User Groups
Commune with other C3D users!
Hear Esteemed Colleague Russ's presentation about styles!
Its open to all users, regardless of your reseller!
Eat free pizza!
Be there!

Thursday, July 05, 2007

Thing that Does More than Meets the Eye


No, its not a transformer, it's a subassembly. Well, I guess in a way a subassembly IS a transformer of sorts, but that's another post.

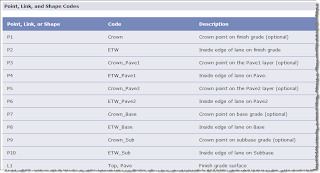
So, I was so confused the other day when I didn't see Crown_Sub code listed in my Corridor Properties under Codes.

Turns out I had to turn Crown Point on Inside to YES before they show up. Once you have that turned on, you can go into your code set style and slap a label on that bad boy. That way you could label elevation of the base at zero offset.
Kooky.

If you go into the Help file to check out your coding diagram, some items say they are optional.

I guess its not that hard, but I'd reword this option as "Show Optional Codes" or something. But that's just me. I ride the short bus to the office.

Tuesday, July 03, 2007

Civil 3D/Revit Jamboree: Part 2


Getting a Revit Building into Civil 3D 2008.

Imagine this: You are a civil engineer working for an AEC firm and you want to make sure the building pad you designed will work with the building the architects designed in Revit Architecture 2008. Roll up those flannel shirt-sleeves and get ready to get to work.

First, truck yourself over to the architecture area to ask them a favor. There is no shame in looking to see if there are donuts in the break room on the way. From Revit, the architect needs to export to a DWG format.

It's important to get a simplified version
of the project. If they have an exterior-only version, use that. These files start to get BIG. A complex Revit structure will take forever to manipulate back on the Autocad side of things.

Have the dude go to File > Export > CAD Formats.

The next window you fellas will see is where to save the thing. Save it to a network location you can get to. It won't take long, so this would not be a good time to engage the drafter in a conversation about ice-fishing or Brett Favre's career.

Back at your desk, clear the Camero screen saver and get back into Civil 3D.

The next thing you should do is open up the Revit drawing on its own to do a little cleanup. Delete any unnecessary objects such as interior fixtures or furniture. Simplify it as much as possible.

Also - figure out where this drawing lies in space. We will ultimately be inserting this as a block, so figure out where 0,0,0 is located. If it does not jive with your coordinate system (and it probably won't) use a combination of the INSBASE command and/or MOVE to get this where you want it. In my example, I set the insertion base point to 0,0,0 and then moved the elements so that the lower left building corner was at 0,0,0 too.

Now we're ready to save and close the architectural dwg and open up the civil project where this will sit. It is okay at this point to refill your Ducks Unlimited mug with fresh black coffee.

Insert the drawing as a block.

Get the building in the correct location in the XY plane. It's best to place it as close as possible from the Insert dialog box because this will be a beast to move after the fact. Apply any rotations here if possible. DO NOT EXPLODE...yet.


Once the Revit building is in the site we can use some new Surface utilities to lift it in the Z direction. Go to Surfaces > Utilities > Move Blocks to Surface...

Select the Revit block.
Click OK.

So, there you have it. If things look good and the building is in the correct location - feel free to explode the block. Once it is exploded you can do all kinds of fun stuff like apply render materials. Or you can leave that to the artsy-fartsy people.

This Means Something


Yeah. I know what it means...it means I have WAY too much time on my hands.

Well, it is a holiday week and the phones are pretty quiet. Also I took two PSE's (Partner Service Exams) yesterday and my brain is feeling a little mushy.

So, I thought I'd share with you my Devil's Tower, WY surface, rendered with...you guessed it...mashed potatoes.


First I found Devil's Tower in Google Earth. I zoomed in nice and close - Google "Eye Altitude" of 7000'. Then, in Civil 3D I set my coordinate system to Wyoming Eastern State Plane WY83-EF, because hey- if you're gunna F-around you might as well do so accurately as possible.

So then I use the schnifty import Google Earth Image and Surface... command.

I was a little disappointed with the DEM resolution of the tower itself.


Armed with some factoids, photos and memory of having been there twice I "guesterpolated" (copywright 2007, Louisa Holland) the rest.

I sketched in some additional contours and added them to the surface.

Now my last step was to whip up a render material. Get it? Whip up?


I found a photo of mashed potatoes through Google images and used it to create a render material. Because the tower is so large and the potato image was so small I had to increase the size of my mashed potatoes by 500x.

Then in the Surface properties, I applied the render material to my tower.

When I get time, I might take this into Viz to make the potatoes more fluffy. Until then this is all I got.