The Cost:
- $795 per seat stand alone license / $945 on a network license
My Favorite Aspects:
- Super-easy linework.
- Ability to reprocess points through Description Keys.
- Downloads, converts formats and pulls in survey data directly from collector in 1 step.
- Forces people to get description keys in order.
- Super-easy linework.
I'm lukewarm about:
- Data Reduction bypasses Survey Database and Figure generation altogether. (But don't we all agree that Survey Database and Figures have some clunkiness to them?)
- Forces people to get description keys in order. (yes, this is both positive and negative).
- It is an add-on. Add-ons tend to be a few months behind on release cycle from Autodesk products.
- Price. If you've got Civil 3D you've already spent some serious coin.
The Details:
Full disclosure statement - I still party with the kids at Eagle Point whenever I get a chance. If you ever get the opportunity, I highly recommend it. They will be at AU this year, make them buy you beer. Tell them Lou sent you.
 After a little begging, eyelash batting and/or ear licking, my buddy, Steve B., sent me the release version of Data Reduction for Civil 3D a day before the official release. I am running this on a 64-bit Vista Business laptop with 4 gig ram. The overhead to run Data Reduction is negligible compared to Civil 3D 2009 so my specs are pretty much a non-issue.
 After a little begging, eyelash batting and/or ear licking, my buddy, Steve B., sent me the release version of Data Reduction for Civil 3D a day before the official release. I am running this on a 64-bit Vista Business laptop with 4 gig ram. The overhead to run Data Reduction is negligible compared to Civil 3D 2009 so my specs are pretty much a non-issue.
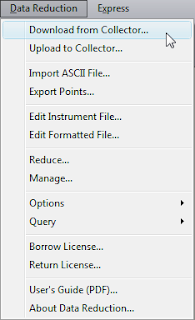
 In a nutshell, Data Reduction contains the tools that I expected Civil 3D to have from the get-go. From a single pull-down menu a user can download directly from most data collectors (via your com ports) and into Civil 3D 2009. It has a much more seamless feel than Survey Link.
 Data Reduction can import the points, add them to a point group (an existing one or one you make on the fly), and create a surface for you in one complete step. Bellisimo!
Data Reduction leverages your description key sets to process points. It's strength is the ease with which you can create survey linework. Users have the choice of using the Description Key as the line name or using the linework designators in a point's description to produce linework.
Personally, my preference is to use Description Keys as the line name, but for folks who are very comfortable with a traditional Eagle Point workflow, they can use fully customizable designators to set up lines. Data reduction places cogo points and polylines in your drawing (not survey points and figures).

For Eagle Point users the workflow is comfortable and logical. For folks who have never used it before, there is one more step you may not expect before you see the fruits of your labor. After the file is downloaded or imported, you need to reduce. The beautiful thing about this is if you forget to set something up in your Description Key Set, re-reducing the job wipes your slate clean and reprocesses your point data.
In closing, I'd say that the Data Reduction gets an A from me. Anyone using Civil 3D 2009 and has surveyors that are a little skeptical will benefit from this product. Try it out, and don't forget to tell them Lou sent you!


