Thursday, November 06, 2008

Support Question of the Day: Proposed Profile After The Fact

Oh to be a full-time blogger. But then again, I wouldn't have the client interactions which keep me on my toes and inspire me to blog.


I've got a bunch of posts in progress but the following is a quickie that had me slack jaw for a few minutes.


Q: What happens if you create P&P sheets based off of an existing ground profile and want to add the proposed profile after the fact?


A: If you are creating P&P sheets in a separate drawing (which you ARE, AREN'T you???) and relying on the automatically created data references to pull data to your new drawing, any new profiles created will not automatically get added to the new drawing.


You have two options:

1) Recreate the sheets. (Which is a sucky option if you've gone and annotated and/or tweaked the P&P sheets.)

2) Manually create a data shortcut to the proposed profile.


  1. In your main drawing, change your Prospector to Master View.

  2. Find the Data Shortcuts area and right-click.

  3. Select New Data Shortcuts Folder.

  4. Create a folder for the data shortcut.

  5. Right-click again and pick Create Data Shortcuts.

  6. Put a check mark in the box for your proposed profile. Civil 3D will automatically grab the alignment too. That's normal.

  7. Jump to your P&P sheet drawing.

  8. In Prospector, browse to your data shortcuts.

  9. Locate the design profile, right-click and select Create Reference

  10. Repeat steps 7-9 for any additional P&P sheet drawing files.

Once the data shortcut has been made, updates will show up in the P&P sheet files as normal.

Civil Engineers Don't Make the News Much...

But when we do, isn't it comforting to know that the Los Angeles signal system is computer controlled?

More to come today.

Friday, October 24, 2008

Product Review: Data Reduction for Civil 3D by Eagle Point

The Cost:
  • $795 per seat stand alone license / $945 on a network license
My Favorite Aspects:

  • Super-easy linework.
  • Ability to reprocess points through Description Keys.
  • Downloads, converts formats and pulls in survey data directly from collector in 1 step.
  • Forces people to get description keys in order.
  • Super-easy linework.

I'm lukewarm about:

  • Data Reduction bypasses Survey Database and Figure generation altogether. (But don't we all agree that Survey Database and Figures have some clunkiness to them?)
  • Forces people to get description keys in order. (yes, this is both positive and negative).
  • It is an add-on. Add-ons tend to be a few months behind on release cycle from Autodesk products.
  • Price. If you've got Civil 3D you've already spent some serious coin.
The Details:

Full disclosure statement - I still party with the kids at Eagle Point whenever I get a chance. If you ever get the opportunity, I highly recommend it. They will be at AU this year, make them buy you beer. Tell them Lou sent you.
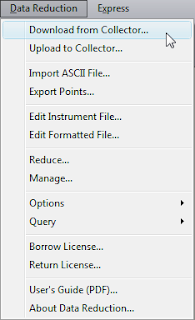
After a little begging, eyelash batting and/or ear licking, my buddy, Steve B., sent me the release version of Data Reduction for Civil 3D a day before the official release. I am running this on a 64-bit Vista Business laptop with 4 gig ram. The overhead to run Data Reduction is negligible compared to Civil 3D 2009 so my specs are pretty much a non-issue.


In a nutshell, Data Reduction contains the tools that I expected Civil 3D to have from the get-go. From a single pull-down menu a user can download directly from most data collectors (via your com ports) and into Civil 3D 2009. It has a much more seamless feel than Survey Link.
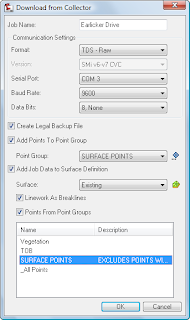


Data Reduction can import the points, add them to a point group (an existing one or one you make on the fly), and create a surface for you in one complete step. Bellisimo!


Data Reduction leverages your description key sets to process points. It's strength is the ease with which you can create survey linework. Users have the choice of using the Description Key as the line name or using the linework designators in a point's description to produce linework.


Personally, my preference is to use Description Keys as the line name, but for folks who are very comfortable with a traditional Eagle Point workflow, they can use fully customizable designators to set up lines. Data reduction places cogo points and polylines in your drawing (not survey points and figures).


For Eagle Point users the workflow is comfortable and logical. For folks who have never used it before, there is one more step you may not expect before you see the fruits of your labor. After the file is downloaded or imported, you need to reduce. The beautiful thing about this is if you forget to set something up in your Description Key Set, re-reducing the job wipes your slate clean and reprocesses your point data.


In closing, I'd say that the Data Reduction gets an A from me. Anyone using Civil 3D 2009 and has surveyors that are a little skeptical will benefit from this product. Try it out, and don't forget to tell them Lou sent you!


Wednesday, October 15, 2008

Coming Soon!

AUGI Chicago was great. Met some really great folks down there, including Andy Parr who is one cool mo-fo civil application engineer. As soon as I get a chance to do so I would like to buy that fellow a few beers.

Here are few topics that I am planning on writing about as soon as I get some time:

  • How to start embracing the ribbon panels with open arms - yes even in Civil 3D.
  • The user-suggested trick of having multiple sets of pipe rules to force different things to happen during design iterations (such as matching inverts).
  • More survey stuff in Map.
  • My review of Eagle Point's product Data Reduction.

Stay tuned.

Thursday, October 09, 2008

Part Builder

Louisa,

I was wonder if you knew of a good book or resource for Civil 3D Part Builder ?

Cheers,
CD

Hi CD -

Generally when people ask about part builder my advice is generally, "Run. Run away. Run screaming." If there is a specific structure you are looking for that doesn't exist in the default library I usually recommend is using a null structure and snapping a block where you need it.

However, if you are feeling a touch masochistic and have time on your hands - part builder is just the thing for you.

There's no part-builder specific books out there, just a hodge-podge of information put together by Autodesk and a few users. Part builder originated in the MEP (mechanical, electrical and plumbing) side of Autodesk so when you crack it open there are very few indicators that you are building a civil thing. Additionally, even though you think you are in AutoCAD, the minute you are in part builder all your CAD knowledge is useless. Part builder does not recognize autocad lines, arcs, circles etc and needs you to do all the drawing from the part builder interface.

Step 1: Watch this video https://www120.livemeeting.com/cc/autodesklearning/view?id=BSD10-19&pw=AudienceThis was the most helpful to me. It was put together for the MEP side of Autodesk software, but it will give you an idea on how the interface is put together.

Step 2: Read chapters 26 and 27 in the Civil 3D users guide. If you installed civil 3d in the default location, it is located in c:\Program Files\AutoCAD Civil 3d 200X\Help\Civil_UG.pdf. Just read this for the terminology and the tips. Don't bother running through the example because it makes no sense.

Step 3: Download the part builder pdfs from Civil3d.com (you may have to sign up for their website to do so - it's worth your time)
http://www.civil3d.com/wp-content/uploads/2007/08/vault-5106-la-with-top-5106-tl3-332.pdf
http://www.civil3d.com/wp-content/uploads/2007/09/no233a.PDF

Step 4: Cross your fingers and go for it. Try not to pull out too much hair!

Good luck and hope this helps! -Lou